
引入
Windows 传统 APP 中,系统都没有提供权限的管控。所以对于一些截屏、录屏和其他隐私功能,我们只能采取一些其他方式,例如 hook 来进行权限管控。
接下来便以拦截截屏为例,来演示权限管理。
确定对应 App 的方式
因为截屏的方式有很多种,确认应用采取的方式后,可以更好的验证,并且不会误伤到其他行为。
💡 实际真实用的时候,需要考虑的点更多。这里只是演示。
通过 Api Monitor 来监听行为
API Monitor 可以通过这里下载:http://www.rohitab.com/downloads
下载后,会得到两个版本。一个 32 位的,一个 64 位的。
如果想监听 32 位应用,就用 32 位的 api monitor;否则就用 64 位的。
这里以 snipaste.exe 为例。
确认其位数: 64位。

找到目标进程
然后在左下角的 Running Processes 中找到对应的应用:
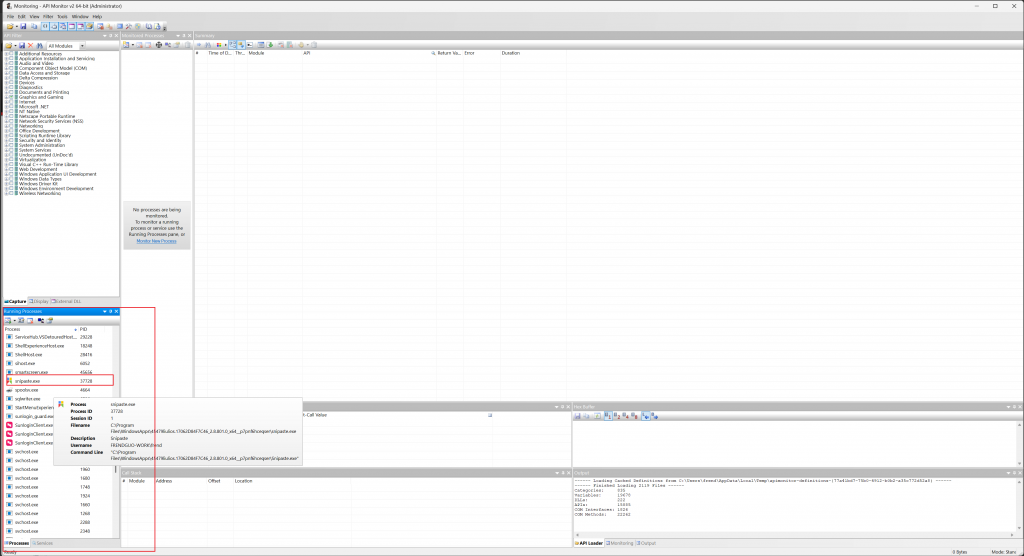
💡 如果找不到你想要的应用。有可能是因为权限的问题,可以用管理员权限打开。或者点击左上方那个管理员盾牌图标。
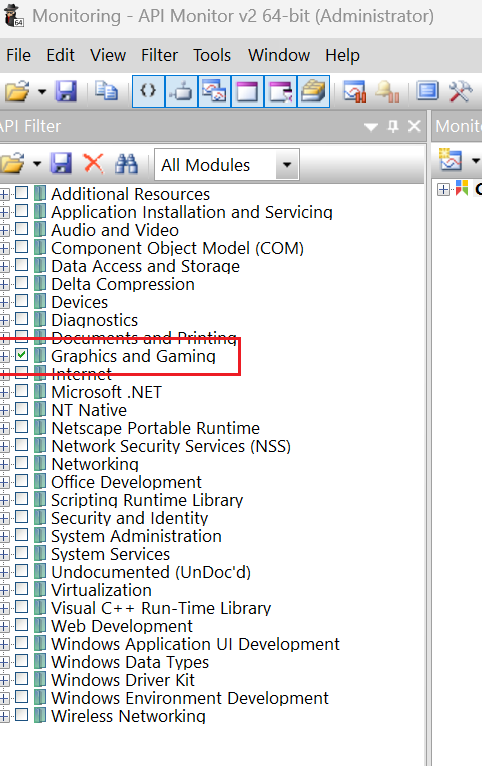
确定要监听的 API 集合
我们这里要查看的是截屏,所以这里选择这个大类【Graphice and Gaming】
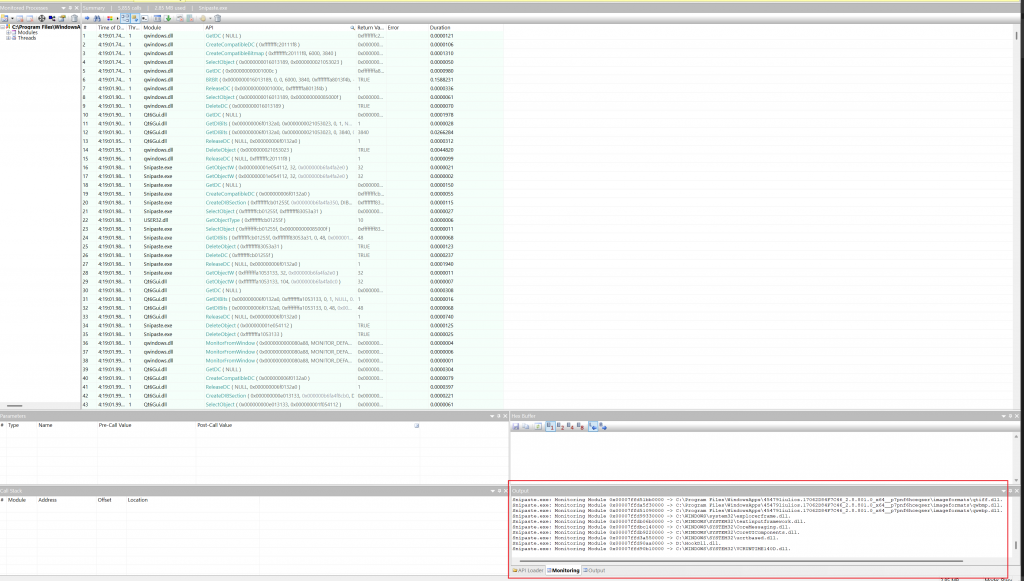
开始监听
通过双击选中的 snipaste.exe 就可以开始进行监听了。就像下面这样:
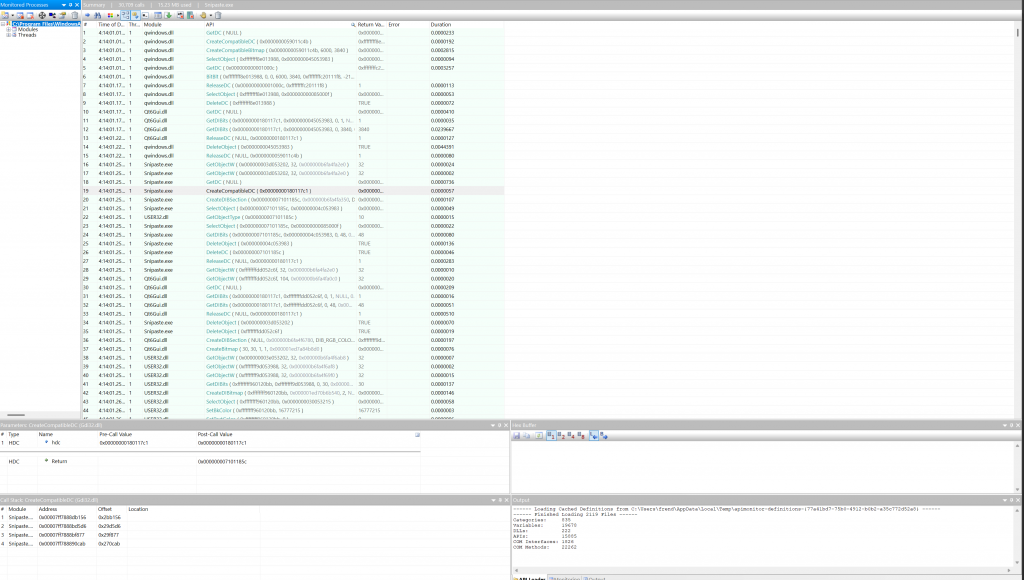
接下来我们尝试截个屏,立马取消,之后暂停监听(左上角工具栏有暂停的图标),就可以看到关键调用:
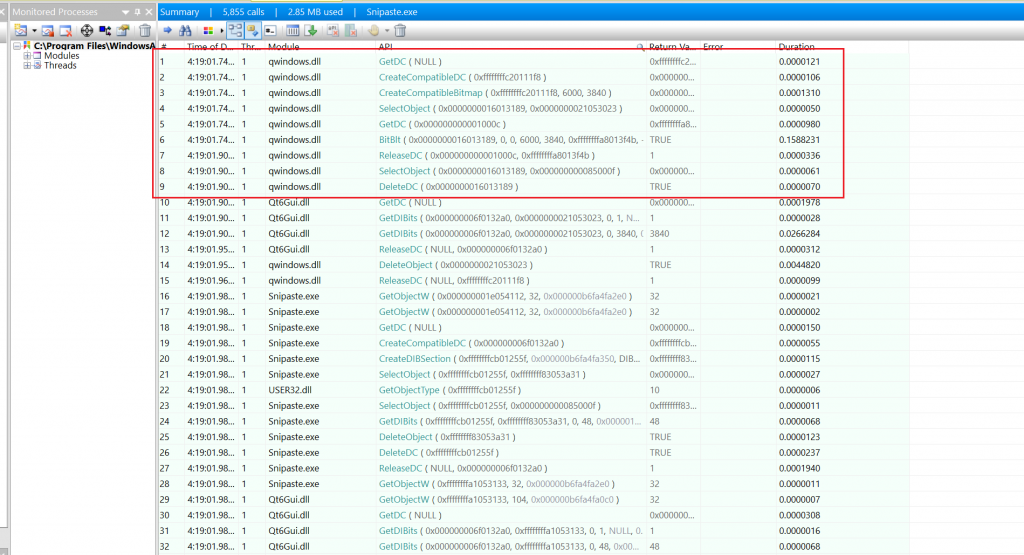
可以确定,它采用的是 gdi 的方式来截屏的。
Hook 对应的 API
确定方式之后,根据调用的接口,我们可以选择 BitBlt 这个接口来进行 hook。BitBlt 的作用是从特定位置拷贝颜色数据到另外一个位置。我们只需要不给它拷贝就可以达到我们的目的了。
关于 BitBlt 可以看:https://learn.microsoft.com/en-us/windows/win32/api/wingdi/nf-wingdi-bitblt
开始 Hook
我们这里采用微软的 hook 库 detours。
只需要通过 vcpkg 进行安装就好了,非常方便快捷。
#include "pch.h"

#include <Windows.h>
#include <detours/detours.h>

static BOOL(WINAPI* TrueBitBlt)(HDC, int, int, int, int, HDC, int, int, DWORD) = BitBlt;

BOOL WINAPI MyBitBlt(
    HDC     hdcDest,
    int     nXDest,
    int     nYDest,
    int     nWidth,
    int     nHeight,
    HDC     hdcSrc,
    int     nXSrc,
    int     nYSrc,
    DWORD   dwRop)
{
    // MessageBox(NULL, L"BitBlt Hooked...", L"BitBlt", MB_OK);
    return TRUE;
}

BOOL APIENTRY DllMain(HMODULE hModule,
    DWORD  ul_reason_for_call,
    LPVOID lpReserved
)
{
    switch (ul_reason_for_call)
    {
    case DLL_PROCESS_ATTACH:
        DetourRestoreAfterWith();

        DetourTransactionBegin();
        DetourUpdateThread(GetCurrentThread());
        DetourAttach(&(PVOID&)TrueBitBlt, MyBitBlt);
        DetourTransactionCommit();
        break;
    case DLL_THREAD_ATTACH:
        break;
    case DLL_THREAD_DETACH:
        break;
    case DLL_PROCESS_DETACH:
        DetourTransactionBegin();
        DetourUpdateThread(GetCurrentThread());
        DetourDetach(&(PVOID&)TrueBitBlt, MyBitBlt);
        DetourTransactionCommit();
        break;
    }
    return TRUE;
}
然后将其编译成一个 dll。这里就叫:HookDll.dll 吧
💡 这里由于我只需要注入到 64 位的应用中,所以只需要编译一个 64 位的 dll。如果有注入到 32 位应用中的诉求的话,需要再编译一个 32 位的 dll。
注入到目标进程
注入进程有很多种方式,这里采用通过 CreateRemoteThread 的方式来注入。新建一个控制台程序,粘贴以下代码:
#include <iostream>
#include <vector>
#include <Windows.h>
#include <tlhelp32.h>

int InjectProcess(DWORD pid) {
    LPCSTR x64DllPath = "D:\HookDll.dll";
    LPCSTR x86DllPath = "D:\x86\HookDll.dll";

    HANDLE hProcess = OpenProcess(PROCESS_ALL_ACCESS, FALSE, pid);
    if (hProcess == NULL)
    {
        std::cout << "OpenProcess failed--" << GetLastError() << std::endl;
        return 1;
    }
    LPCSTR dllPath = x64DllPath;
    BOOL bIsWow64 = FALSE;
    IsWow64Process(hProcess, &bIsWow64);
    if (bIsWow64) {
        dllPath = x86DllPath;
    }

    LPVOID pDllPath = VirtualAllocEx(hProcess, 0, strlen(dllPath) + 1, MEM_COMMIT, PAGE_READWRITE);
    if (pDllPath == NULL)
    {
        std::cout << "VirtualAllocEx failed--" << GetLastError() << std::endl;
        return 1;
    }

    // 写入DLL路径
    WriteProcessMemory(hProcess, pDllPath, (LPVOID)dllPath, strlen(dllPath) + 1, 0);

    // 创建远程线程
    HANDLE hThread = CreateRemoteThread(hProcess, 0, 0, (LPTHREAD_START_ROUTINE)LoadLibraryA, pDllPath, 0, 0);

    // 等待远程线程结束
    WaitForSingleObject(hThread, INFINITE);

    // 清理
    VirtualFreeEx(hProcess, pDllPath, strlen(dllPath) + 1, MEM_RELEASE);
    CloseHandle(hThread);
    CloseHandle(hProcess);

    return 0;
}

std::vector<DWORD> FindProcessIdByName(LPCWSTR name) {
    std::vector<DWORD> pids;
    HANDLE hSnapshot = CreateToolhelp32Snapshot(TH32CS_SNAPPROCESS, 0);
    if (hSnapshot == INVALID_HANDLE_VALUE)
    {
        std::cout << "CreateToolhelp32Snapshot failed--" << GetLastError() << std::endl;
        return pids;
    }

    PROCESSENTRY32 pe;
    pe.dwSize = sizeof(PROCESSENTRY32);
    if (!Process32First(hSnapshot, &pe))
    {
        std::cout << "Process32First failed--" << GetLastError() << std::endl;
        CloseHandle(hSnapshot);
        return pids;
    }

    do
    {
        if (wcscmp(pe.szExeFile, name) == 0)
        {
            pids.push_back(pe.th32ProcessID);
        }
    } while (Process32Next(hSnapshot, &pe));

    CloseHandle(hSnapshot);
    return pids;
}

int main()
{
    auto pids = FindProcessIdByName(L"snipaste.exe");
    for (auto pid : pids) {
        std::cout << "Injecting process " << pid << std::endl;
        InjectProcess(pid);
    }

    return 0;
}
然后就可以以管理员权限运行起来了。
💡 这里管理员权限不是必须的。结合实际来
💡 上述 HookDll.dll 的路径请根据实际路径修改
看看效果
运行起来,如果没有意外的话,应该就可以在 process exproloer 中看到了。
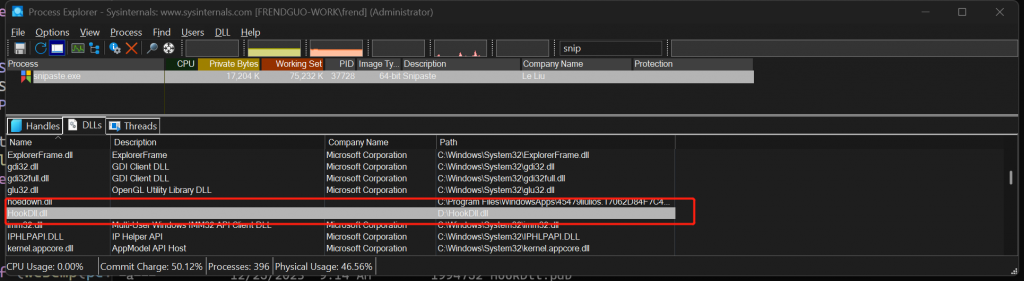
然后再截个屏,你就只能得到一个黑屏的图片了。
(效果看自己的~
如何调试
如果发生意外的话,没有成功的 hook。我们就需要来进行调试了
意外我们需要分阶段来分析:
没有注入成功
也就是在 snipaste.exe 中没有看到注入的 dll。
这个可以通过 VS 中单步调试控制太程序,看看在注入的哪步出错了。(也可以用 windbg 来看,不过这里 VS 应该更便捷)
如果都没问题,那很有可能是因为位数的问题。
确认了控制台程序没问题的话,可以看看 API Monitor 中的 Monitoring 窗口,是不是有对应的 dll 被加载:
注入了,但没生效
相当于需要调试 HookDll 的代码,这就可以通过 Windbg 的附加进程来进行调试了。
附加上去之后,通过以下命令来添加 dll 加载时的断点:
0:005> sxe ld hookdll
0:005> g
当 hookdll 加载的时候,就会进入断点,显示如下:
ModLoad: 00007ffd37c20000 00007ffd37c56000   D:HookDll.dll
ntdll!NtMapViewOfSection+0x14:
00007ffd`c36e8f24 c3              ret
0:005> k
 # Child-SP          RetAddr               Call Site
00 000000130e6ff128 00007ffdc35f27a8     ntdll!NtMapViewOfSection+0x14
01 000000130e6ff130 00007ffdc35f2141     ntdll!LdrpMinimalMapModule+0x1f4
02 000000130e6ff1f0 00007ffdc35f0e0c     ntdll!LdrpMapDllWithSectionHandle+0x51
03 000000130e6ff4b0 00007ffdc35f01c1     ntdll!LdrpMapDllNtFileName+0x26c
04 000000130e6ff5b0 00007ffdc35ef06a     ntdll!LdrpMapDllFullPath+0xf5
05 000000130e6ff740 00007ffdc360be4a     ntdll!LdrpProcessWork+0x14a
06 000000130e6ff790 00007ffdc360b9e0     ntdll!LdrpLoadDllInternal+0x2fa
07 000000130e6ff820 00007ffdc364aa5d     ntdll!LdrpLoadDll+0x100
08 000000130e6ff9f0 00007ffdc10a3e89     ntdll!LdrLoadDll+0x18d
09 000000130e6ffaf0 00007ffdc265c7e7     KERNELBASE!LoadLibraryA+0xe9
0a 000000130e6ffb60 00007ffdc35ec7c0     KERNEL32!BaseThreadInitThunk+0x17
0b 000000130e6ffb90 0000000000000000     ntdll!RtlUserThreadStart+0x20
然后打个断点到 DllMain
bu HookDll!DllMain接下来就可以开心的调试了。
特别地
如果要用于生产环境,请注意:
- hook 的 api 尽量功能单一,避免误杀
- 对于 hook 的方法的返回和行为尽量多思考,避免导致其他程序崩溃
- 最好能覆盖较多相同功能的 API,防止拦截失败
- 等等

0